In Part 1, I introduced the Smart Shelf concept, the sensor used, and the web page for displaying real-time updates.
Since then, I have also created a short video to demonstrate the project:
Part 1 explained how I used the Sparkfun ESP8266 Thing and the C SDK. For reliability reasons (in my case, when presenting / demonstrating in front of a live audience you ideally want things to work!), I have always preferred to use the C SDK, especially after the problems I experienced with Lua causing frequent reboots when I tried that approach a year ago.
 But with the arrival earlier this year of the Arduino IDE, there is now a compelling alternative, which seems to work well (based on my limited experiments). So, as illustrated in this post, if you are an Arduino user, my view is that connecting a NodeMCU board and programming using the Arduino IDE is no more difficult than developing using an official Arduino board. The advantage is that you get built-in Wi-Fi, a smaller form factor and all this at a fraction of the cost. So for many applications, using an ESP8266 dev board like the NodeMCU might be the approach to consider first.
Because the goal in this part 2 is simplicity, I have chosen to use a polling loop rather than callback functions, and also not to implement supply voltage monitoring.
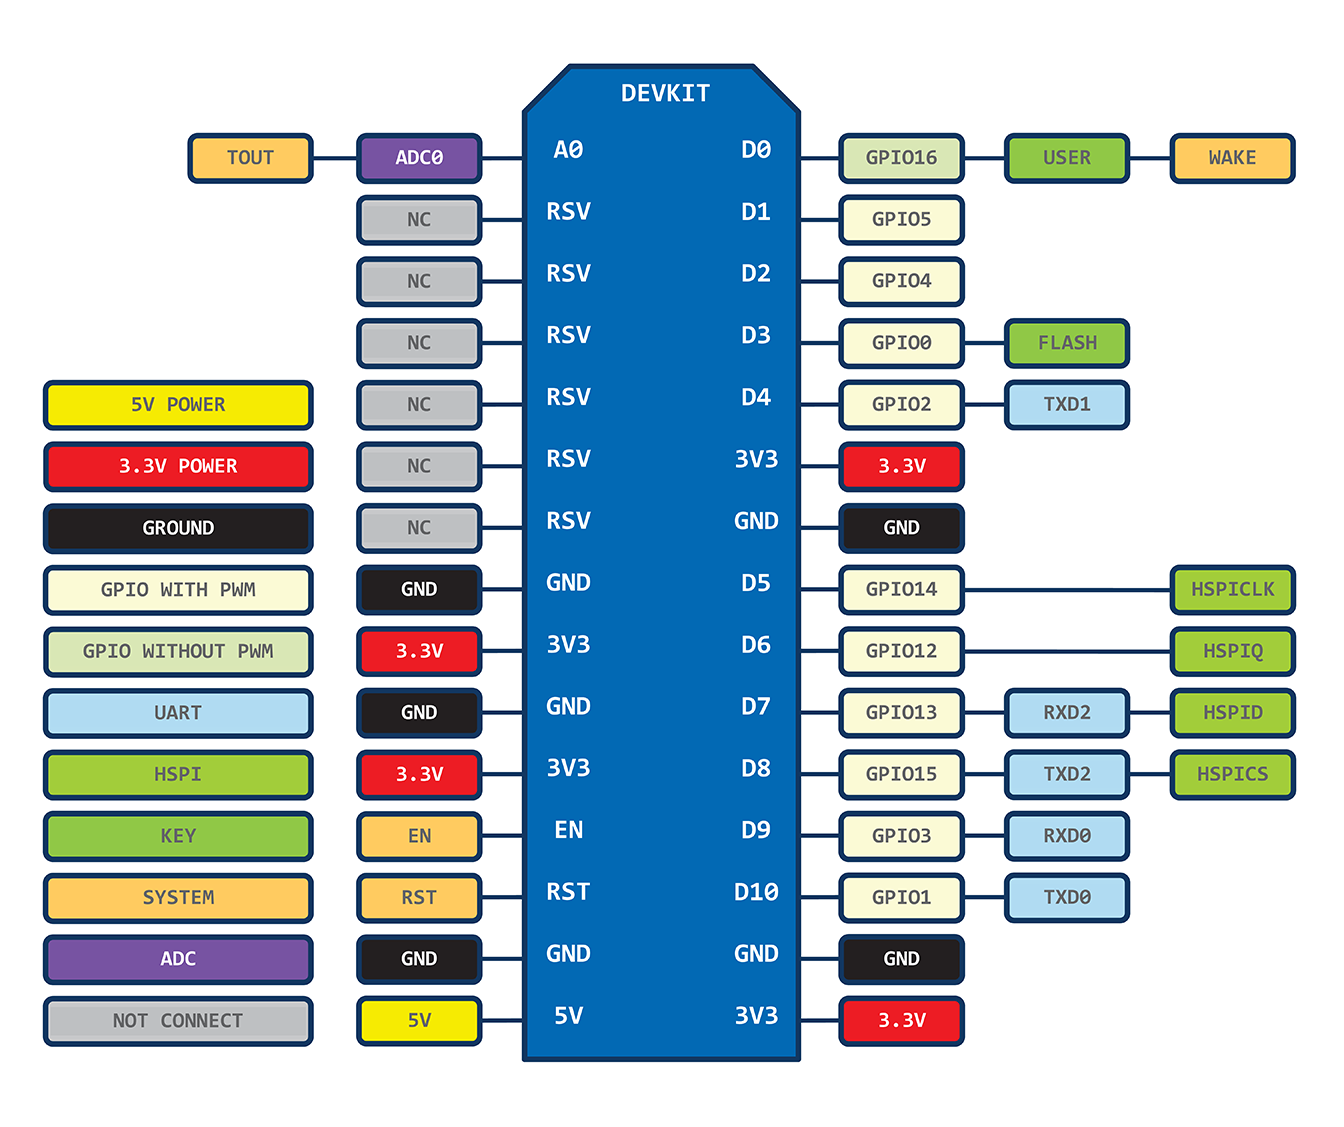
For Arduino developers, one difference that you do need to be aware of is that references to IO pins are based on the ESP8266 and NOT the Arduino port numbering. This means, for example, that to write to port D0, you would need to write to GPIO16, as explained in the nodemcu-devkit diagram here.
digitalWrite(16, 1); //Write a 1 to D0 (i.e. GPIO16)
Wiring up the breadboard
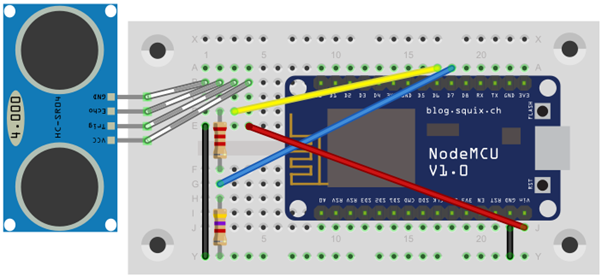
 As described in part 1, two resistors are required to convert the 5V output of the ultrasonic sensor to a 3.3V ESP8266-compatible input.
Installing the Arduino Environment
To setup your environment, just follow these steps. Resist the temptation to install a later Arduino version than the one recommended on that page. At the time of writing, this is 1.6.5; version 1.6.6 does not work.
Because the architecture uses MQTT, you will need to add the PubSubClient library to your environment in the usual way from the menu Sketch > Include Library > Manage Libraries…
Programming the NodeMCU
A big advantage of the Arduino ecosystem is the huge codebase that exists on the Web. To interface with the HC-SR04, I reused some of the code from this tutorial: How to use the HC-SR04 Distance Measuring Sensor.
Also, the code listed below is ALL the code you need – in one place, not spread over multiple files as is more typical with the C SDK.
[Update 19 Sep 2016]: I have updated the code to be better able to handle:
- Sporadic readings due to noise or movement under the sensor
- Connecting / reconnecting to Wi-Fi
- Use a name for MQTT broker instead of an ip address, which may change over time for a public broker
- Use the default PubSubClient accessed from the Arduino Library menu
- Disable serial debugging when not required
You can download the Arduino code at https://github.com/tinkermax/smartshelf under the SmartShelf folder.
To use the code, you will first need to insert your Wi-Fi station and password into the Config.h file. The reason I moved this into a separate file is so that you can consume code updates without overwriting your own configuration info.
I am sorry ! help me !how to connect with computer and receive data?
Have a look at my post “ESP8266 SMART SHELF – PART 1” under the heading “Shelf Demonstration GUI”. Save that code as “index.html” in a folder together with “fabric.js” and “mqttws31.js”, both of which you can download from the Internet. You can then open index.html directly in your Chrome browser.
hello test.mosquitto.org seems to be down any other alternative do you suggest ?
I have just checked: test.mosquitto.org is definitely still working. Be aware that this is not an http address that is accessible via a web browser. You have to connect using MQTT, for example using the mqtt-spy client as described here
Thank you i will look into it , your blog is like a gold mine the more i dig the more i get
Thanks for the encouragement! Actually I now find you are correct – there is an issue: the test.mosquitto.org ip address has changed. I have now updated the code above. I will shortly be adding a link to github with an improved version where you just specify “test.mosquitto.org”, not the ip address.
In case you’re looking for another sensor, I’ve made very good experience with their SRF02 http://www.robotshop.com/en/srf02-ultrasonic-range-finder.html
I2C interface, auto calibration, noise elimination, temperature compensation and single transceiver capsule. Works down to 1.8V for powering with 2xAA battery. Also, you can change the I2C address via software in order to queue a few of these on a single bus.
Cheers
Thanks, that looks like an interesting device! My only worry is that the specs at http://www.robot-electronics.co.uk/htm/srf02tech.htm say that the minimum range is > 15 -18 cm – which would not work for my shelf application.
Hello, Mr. TinkerMax.
I encountered a problem while trying to run this code.
I am unable to connect to MTTQ server and client.state() returns the value of -2. Please help as soon as possible.
I’m new to all of this but I’m curious as to why you need the 4,7k resistor? if you were to remove it the current would still flow to pin D8?