-
 Part 1 uses a Sparkfun ESP8266 Thing and the C SDK.
 - Part 2 uses a NodeMCU and Arduino IDE.

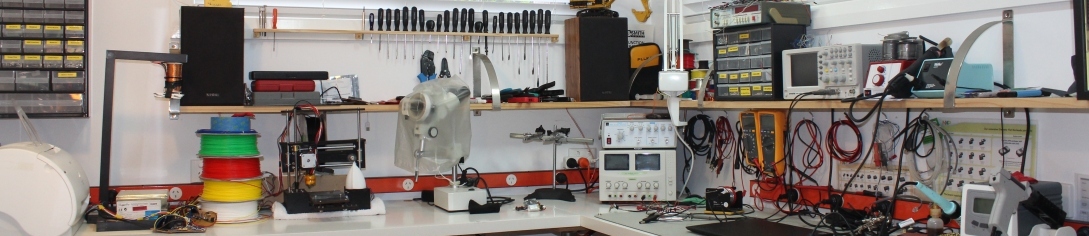
ESP8266 Dev Boards
I have realised, after spending some time building small projects using the ESP-01, ESP-03 and ESP-12 modules running off battery power, that it can be quite time consuming and tedious to build the necessary power supply circuit and wire up serial connectors each time. Also, where space is not critical (unlike in my train project), it becomes quite compelling to consider dev boards that integrate an ESP8266, together with other features, in an-easy to use (bread-boardable) form factor.
This is even more the case if you look at the falling prices of, for example, the NodeMCU board on AliExpress, You are not likely to be able to build your own equivalent at a lower cost, even discounting the time it would take.
In my type of interactive projects (where the ESP8266 cannot be put into deep sleep for extended periods), operating off battery power realistically means using LiPo/LiIon. As a result, I found myself having to disconnect the battery, attach it to a LiPo charger and then reconnect for every charge cycle.
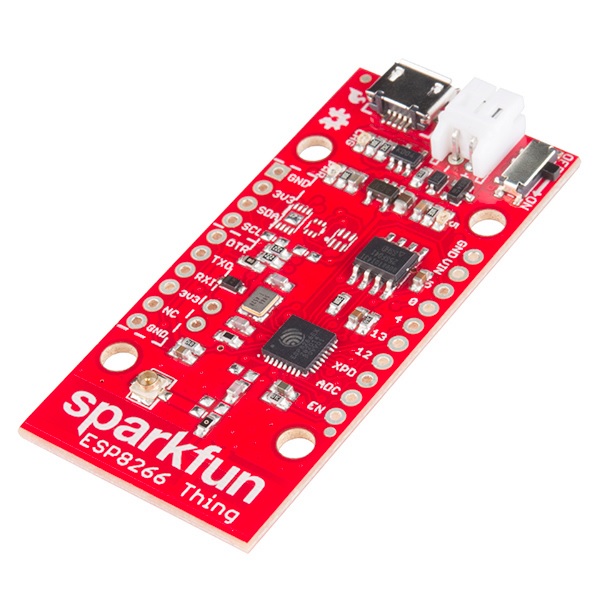
This is when I saw that the Sparkfun ESP8266 Thing “includes a LiPo charger, power supply, and all of the other supporting circuitry”. Very convenient for what I had in mind…
But before I get to that, I want to be clear that the Sparkfun ESP8266 Thing is actually not my favourite module for the following reasons:
- It is relatively expensive (more than 5 times the price of one of those NodeMCU boards listed above, including shipping)
- Programming is not done neatly via the USB port like in the NodeMCU, so requires an additional 3.3V FTDI USB converter (or equivalent).
- Unfortunately, the serial programming lines interfere with debugging via the serial port after programming, which requires that you install terminal software (e.g. RealTerm) that can disable toggling the DTR line, as described in the Sparkfun Hookup Guide. I have not yet tried the Adafruit Huzzah, but it does not appear to have this problem, although requires you to fiddle about with buttons to get into programming mode. In contrast, the NodeMCU board simply handles (transparently in the background) toggling GPIO0 low for a programming cycle.
It is worth noting that Sparkfun’s newer ESP8266 Thing – Dev Board fixes these issues (other than the price) – but then does not include a LiPo charger!
It would be interesting to find an inexpensive LiPo charger/management board that one could pair with a NodeMCU, if anyone knows of such a thing?
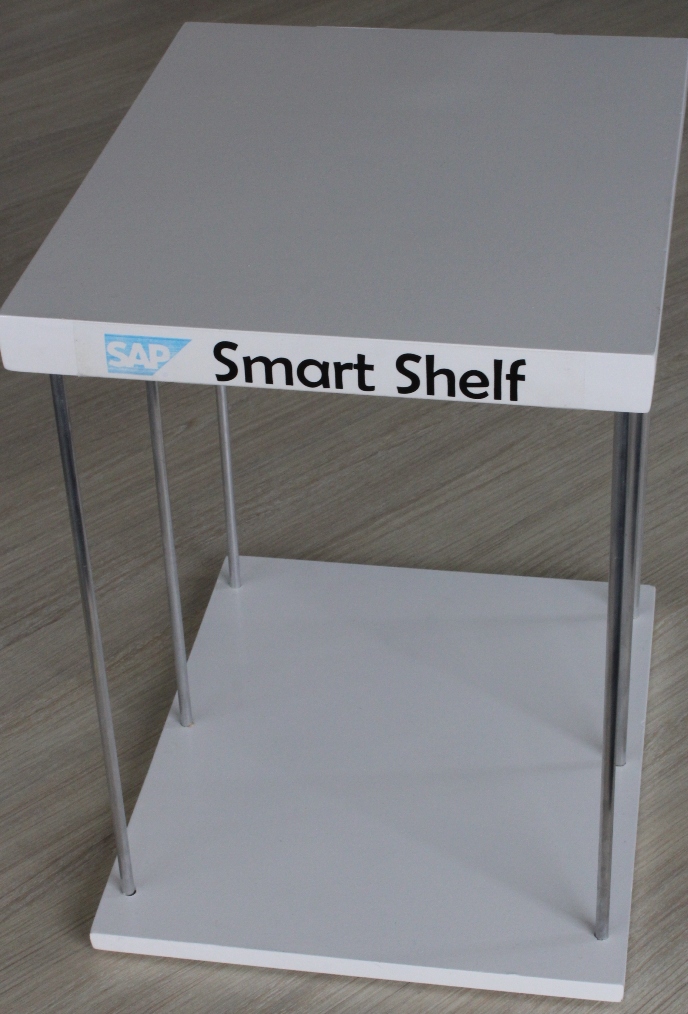
Smart Shelf Concept
An opportunity arose in my day job to demonstrate the linkage of real-time retail inventory shelf levels to a commercial cloud platform.
Imagine this scenario at your local retailer. During busy periods (which at my local supermarket seems to be most of the time), items regularly run out before they can be restocked. This leads to a loss of sales, but even more seriously, damages the store’s brand in the mind of the shopper.
A “smart” shelf would be able to alert a store manager (via phone or smart watch) the instant a shelf reached a pre-defined critical level. The manager would then be able to respond (and ultimately plan based on predicted shopper activity) by co-ordinating staff to replenish the shelf before an actual stock-out occurred.
Shelf Electronics
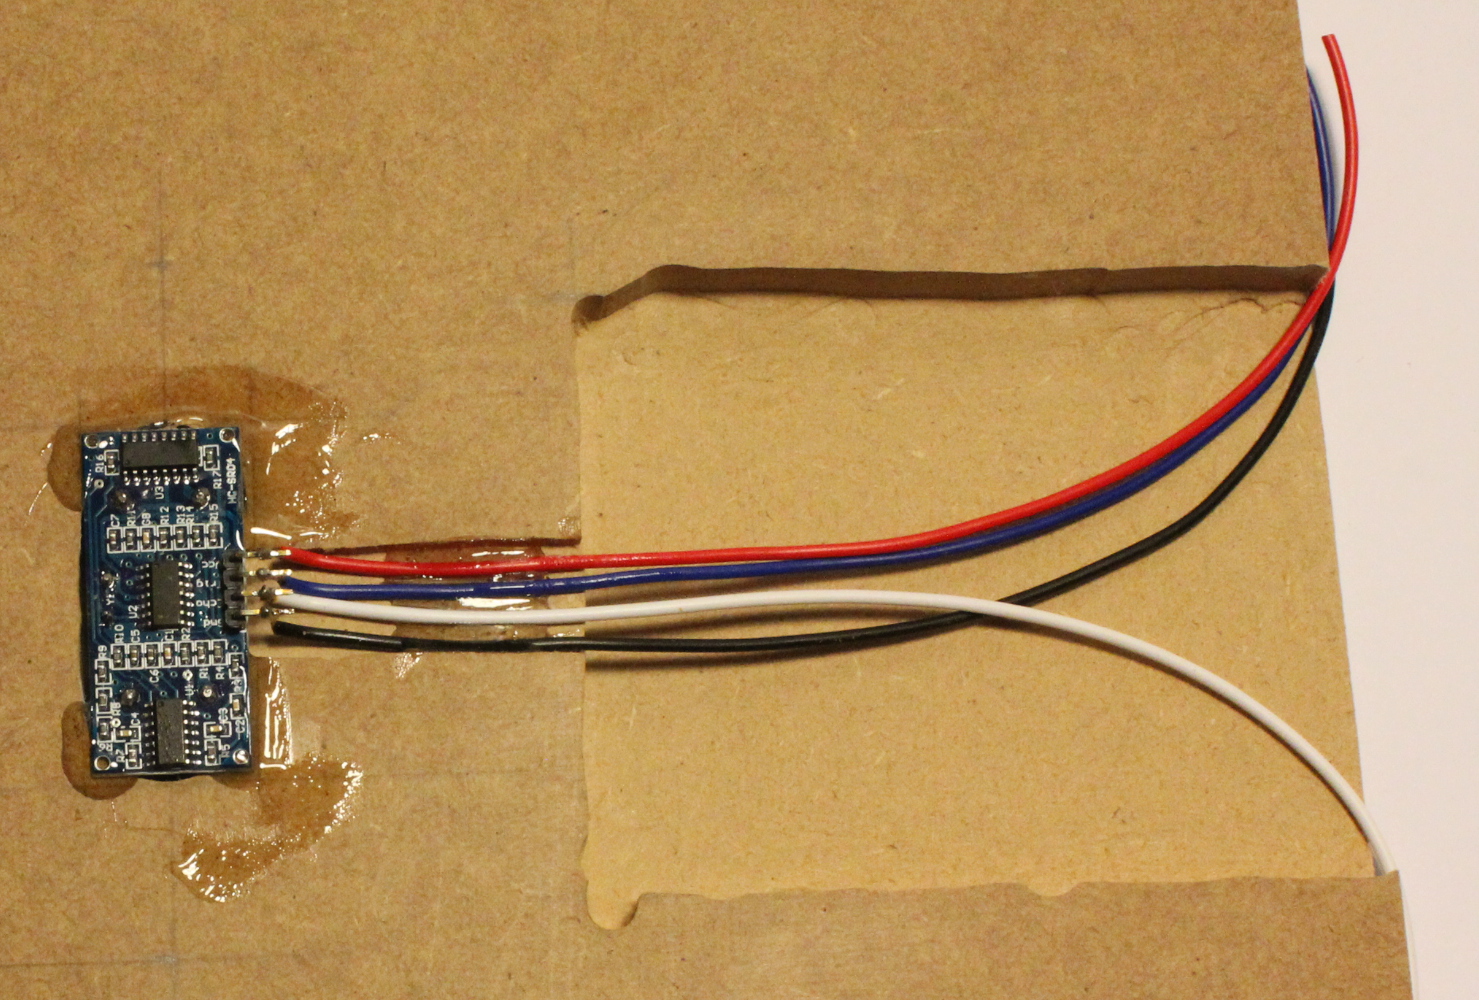
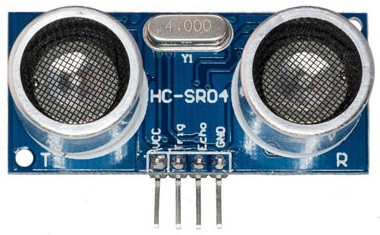 An ultrasonic sensor is used to read the level of goods on a shelf: namely the cheap and cheerful HC-SR04, which uses the time of flight of an ultrasonic pulse to determine distance.
 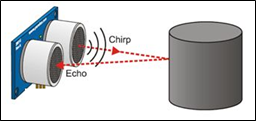 It has 4 pins: GND, VCC, Trigger and Echo. Trigger and Echo are connected to the ESP8266 GPIO pins 12 and 13 respectively. A drawback with this ultrasonic sensor is that it operates off 5V, which is more than the 3.7 – 4.2 V Li-Ion battery can supply.
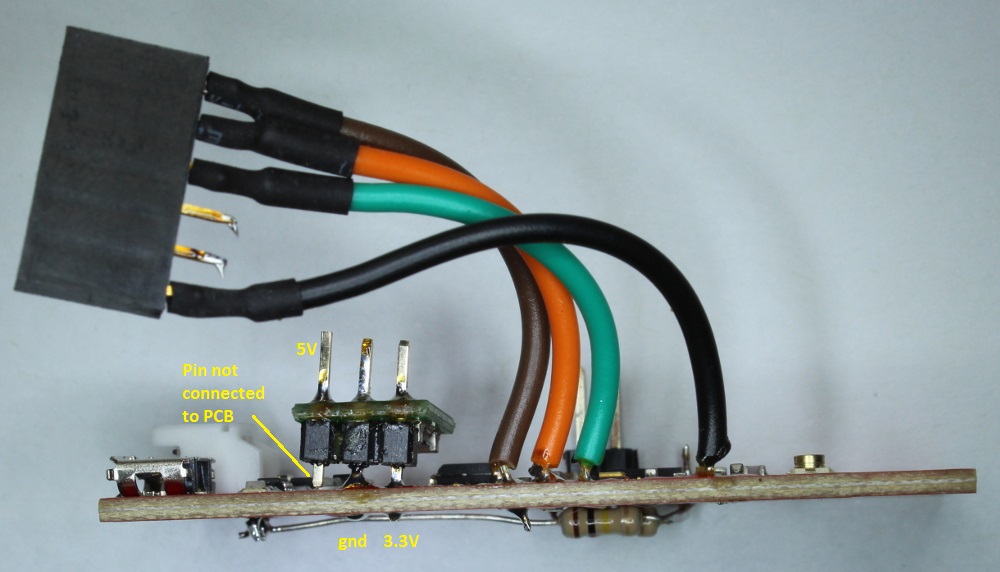
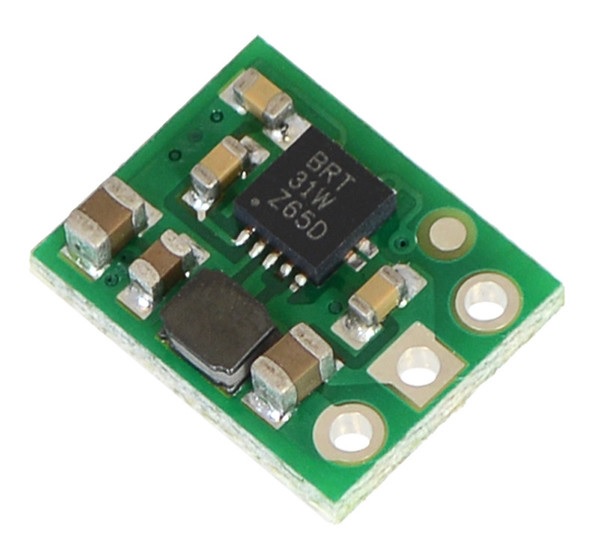 To solve this problem, I used a Polulu step-up voltage regulator, soldered directly to the Thing board. This 3-pin regulator is very simple to use – gnd, input voltage (0.5 – 5.5V) and 3.3V output.
Although initially designed for a 1 hour presentation, it is foreseable that the Smart Shelf could be demonstrated at an all day-trade exhibition. 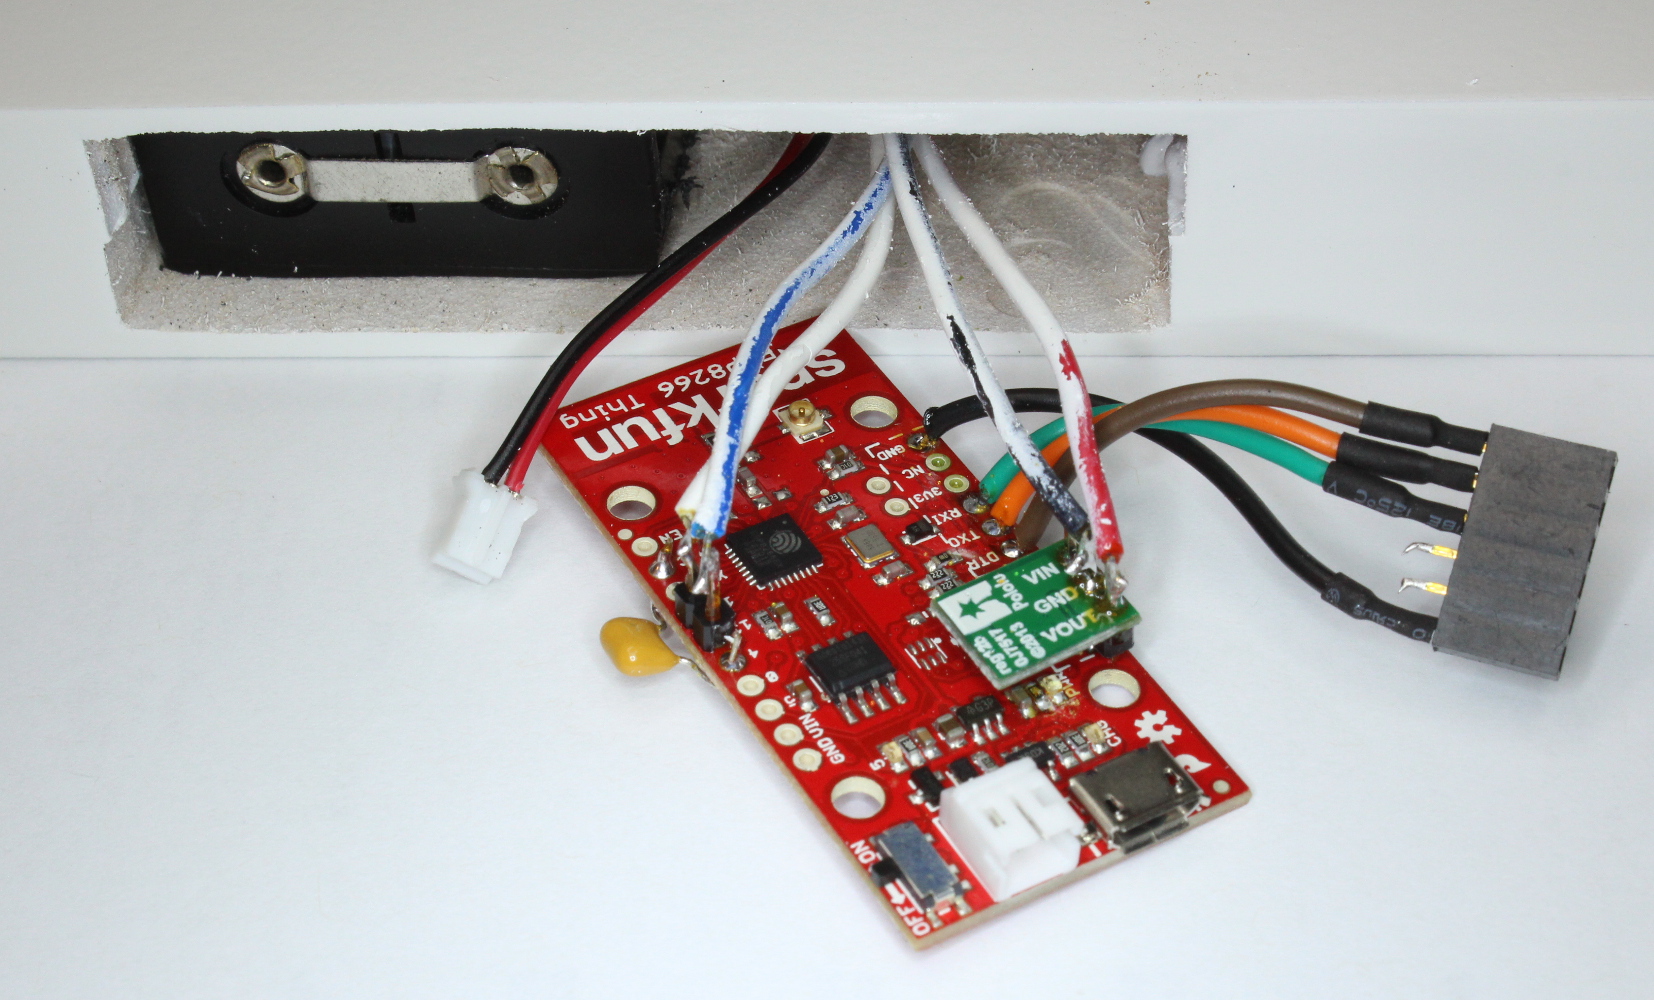 I therefore went for overkill and designed for 2 x 18650 Li-Ion cells in parallel. These look like oversized AA batteries, and are apparently the same as those used in the Tesla Roadster (!). They could just be persuaded to fit inside my smart shelf, with a bit of judicious sanding down of the battery holder.
Because my 18650 cells are of the unprotected type, if discharged below 3 volts, they will be ruined and no longer usable. For this reason, I felt it necessary to include battery monitoring. For this, I inserted a potential divider between the battery +ve input and ground, feeding the ADC input (which accepts a maximum of 1V, hence the need for the divider).
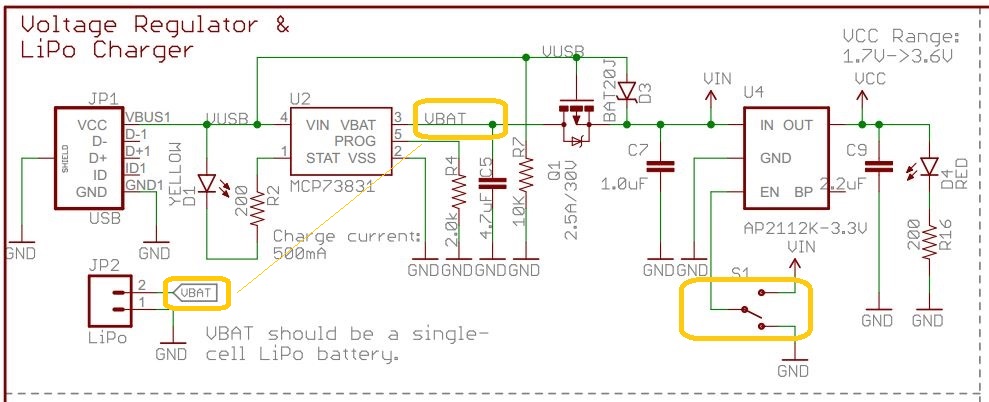
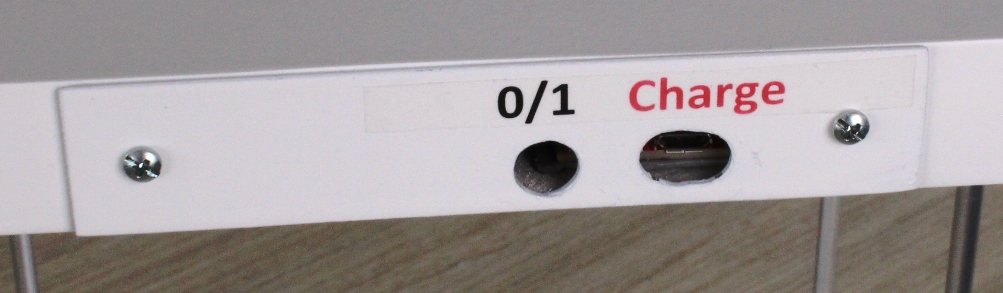
I was then concerned about the slow discharge that would occur through the divider when the shelf was turned off for long periods, because the Sparkfun Thing on/off switch merely toggles a voltage regulator downstream of the potential divider, as shown in the Thing schematic:
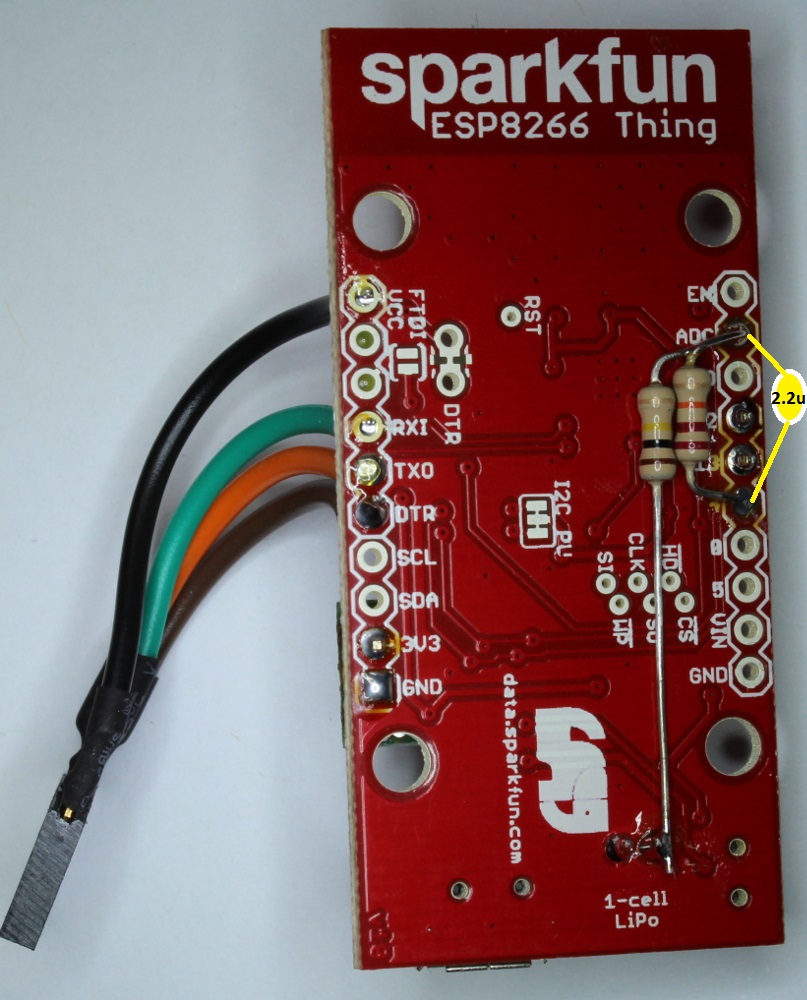 So, instead of connecting the divider to ground, I connected it to GPIO4. Because this is high impedance by default, no current will flow through the divider when the ESP8266 is powered off. During intialisation, I set this pin to output and low, which will ground the divider and enable subsequent voltage measurements to take place.
Finally, because of the intermittent load profile of the ESP8266, it was necessary to add LP smoothing in the form of a capacitor across the lower resistor in the divider. I chose a value of 2.2μF for the capacitor because that was the largest value I had in a small physical size. (The photo on the right was taken before the actual capacitor was added.) This will remove most of the transient fluctutations. A data sample is then further averaged over 240 readings, after which the result is sent as a battery voltage once per minute.
Shelf Hardware Build
 The shelf hardware required some basic woodworking skills.
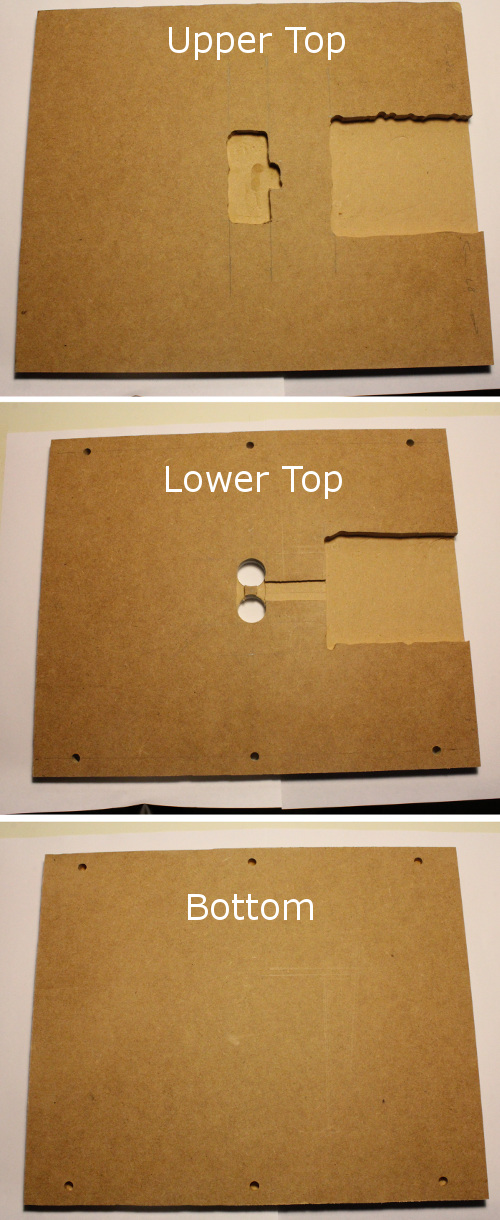
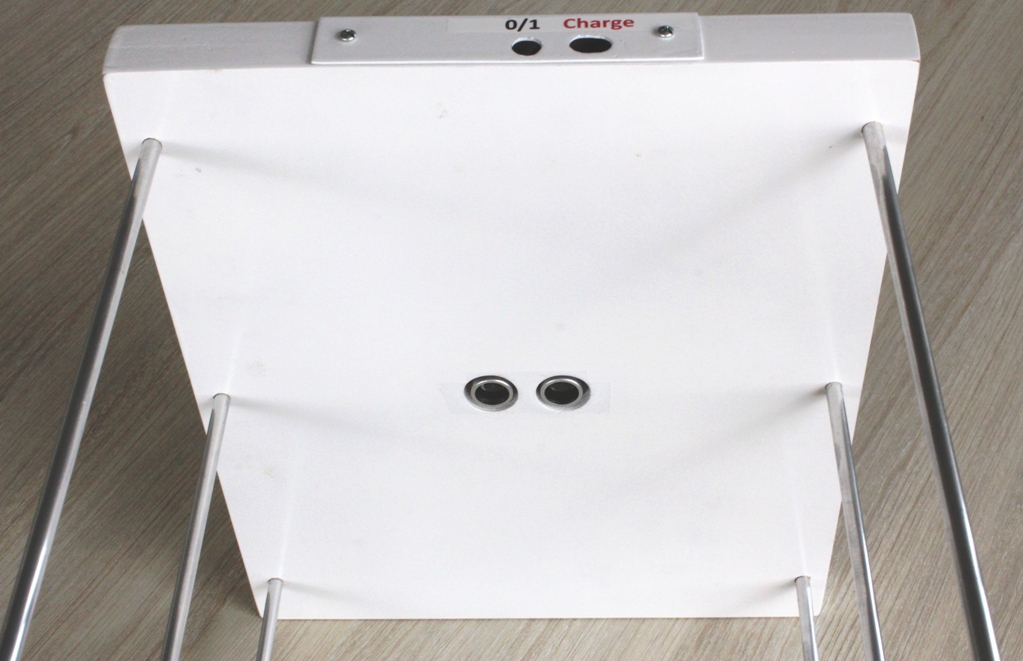
The shelf was sized to fit reams of A4 photocopier paper, and made from 3 pieces of MDF. The top 2 pieces were glued together with white wood glue after a cavity to house the sensor and electronics had been routed out.
 Once the electronics had been inserted, the wood was spraypainted white, as was a flat piece of aluminium used as a back panel cover. This was labelled by printing onto a clear page of contact.
 Six lengths of solid aluminium rod (6mm diameter) were cut to length with a hacksaw, and used to connect the top and bottom sections. Although the fit was fairly tight, the rods were additionally epoxied in to ensure robustness.
Shelf Embedded Software
As discussed in earlier posts on this site, I used the Unofficial Development Kit with an included MQTT library by tuanpmt.
I also found an excellent ultrasonic sensor library, which simply just worked once I had imported the files under the “driver” folder into my project structure (and included the additional #define in user_config.h).
You will need an MQTT broker. This could be your own (e.g. on a Raspberry PI or a cloud broker like CloudMQTT). For my test I used the public Mosquitto broker.
Below is my entire main.c file.
A tick_service routine is called 4 times per second, which does the following:
- Samples and averages the battery over 240 readings (i.e. one minute)
- Sends the averaged raw battery reading every minute
- Measures distance using the ultrasonic sensor
- Sends the distance using mqtt, but only if >= 10mm difference from the last reading (to avoid unnecessary messages due to noise)
/* main.c -- MQTT client example
*
* Copyright (c) 2014-2015, Tuan PM <tuanpm at live dot com>
* All rights reserved.
*
* Redistribution and use in source and binary forms, with or without
* modification, are permitted provided that the following conditions are met:
*
* * Redistributions of source code must retain the above copyright notice,
* this list of conditions and the following disclaimer.
* * Redistributions in binary form must reproduce the above copyright
* notice, this list of conditions and the following disclaimer in the
* documentation and/or other materials provided with the distribution.
* * Neither the name of Redis nor the names of its contributors may be used
* to endorse or promote products derived from this software without
* specific prior written permission.
*
* THIS SOFTWARE IS PROVIDED BY THE COPYRIGHT HOLDERS AND CONTRIBUTORS "AS IS"
* AND ANY EXPRESS OR IMPLIED WARRANTIES, INCLUDING, BUT NOT LIMITED TO, THE
* IMPLIED WARRANTIES OF MERCHANTABILITY AND FITNESS FOR A PARTICULAR PURPOSE
* ARE DISCLAIMED. IN NO EVENT SHALL THE COPYRIGHT OWNER OR CONTRIBUTORS BE
* LIABLE FOR ANY DIRECT, INDIRECT, INCIDENTAL, SPECIAL, EXEMPLARY, OR
* CONSEQUENTIAL DAMAGES (INCLUDING, BUT NOT LIMITED TO, PROCUREMENT OF
* SUBSTITUTE GOODS OR SERVICES; LOSS OF USE, DATA, OR PROFITS; OR BUSINESS
* INTERRUPTION) HOWEVER CAUSED AND ON ANY THEORY OF LIABILITY, WHETHER IN
* CONTRACT, STRICT LIABILITY, OR TORT (INCLUDING NEGLIGENCE OR OTHERWISE)
* ARISING IN ANY WAY OUT OF THE USE OF THIS SOFTWARE, EVEN IF ADVISED OF THE
* POSSIBILITY OF SUCH DAMAGE.
*/
#include "ets_sys.h"
#include "driver/uart.h"
#include "driver/ping.h"
#include "osapi.h"
#include "mqtt.h"
#include "wifi.h"
#include "config.h"
#include "debug.h"
#include "gpio.h"
#include "user_interface.h"
#include "mem.h"

MQTT_Client mqttClient;
LOCAL os_timer_t sys_timer;

static Ping_Data pingA;
static float last_distance = 0;
static uint32 batt_voltage_accum = 0;
static uint8 batt_voltage_count = 0;

void wifiConnectCb(uint8_t status)
{
if(status == STATION_GOT_IP){
MQTT_Connect(&mqttClient);
} else {
MQTT_Disconnect(&mqttClient);
}
}
void mqttConnectedCb(uint32_t *args)
{
MQTT_Client* client = (MQTT_Client*)args;
INFO("MQTT: Connected\r\n");
}

void mqttDisconnectedCb(uint32_t *args)
{
MQTT_Client* client = (MQTT_Client*)args;
INFO("MQTT: Disconnected\r\n");
}

void mqttPublishedCb(uint32_t *args)
{
MQTT_Client* client = (MQTT_Client*)args;
//INFO("MQTT: Published\r\n");
}

void mqttDataCb(uint32_t *args, const char* topic, uint32_t topic_len, const char *data, uint32_t data_len)
{
char *topicBuf = (char*)os_zalloc(topic_len+1),
*dataBuf = (char*)os_zalloc(data_len+1);

MQTT_Client* client = (MQTT_Client*)args;

os_memcpy(topicBuf, topic, topic_len);
topicBuf[topic_len] = 0;

os_memcpy(dataBuf, data, data_len);
dataBuf[data_len] = 0;

INFO("Receive topic: %s, data: %s \r\n", topicBuf, dataBuf);
os_free(topicBuf);
os_free(dataBuf);
}

void user_rf_pre_init(void)
{
}

LOCAL void ICACHE_FLASH_ATTR tick_service(uint32_t *args)
{
static char msg[63];
int msglen;
float distance = 0;
const float maxDistance = 400; // 40 cm

MQTT_Client* client = (MQTT_Client*)args;

batt_voltage_accum += system_adc_read();

if (++batt_voltage_count >= 240) {
msglen = os_sprintf(msg,"%d", batt_voltage_accum / 240);
MQTT_Publish(client, mqttBattery, msg, msglen, 0, 0);
INFO("Batt:%d\r\n",batt_voltage_accum / 240);
batt_voltage_accum = 0;
batt_voltage_count = 0;
}

if (ping_ping(&pingA, maxDistance, &distance) ) {
//INFO("A Response ~ %d mm \n", (int)distance);
} else {
//INFO("Failed to get any response from sensor A.\n");
distance = maxDistance;
}

if (distance < 10) { distance = 10; } if (distance > maxDistance) {
distance = maxDistance;
}

if (abs(distance - last_distance) >= 10) {
msglen = os_sprintf(msg,"%d", (int)distance);
INFO("Dist:%s mm\r\n",msg);
MQTT_Publish(client, mqttPubTopic, msg, msglen, 0, 0);
last_distance = distance;
}

}

void user_init(void)
{
uart_init(BIT_RATE_115200, BIT_RATE_115200);
os_delay_us(1000000);

CFG_Load();

ping_init(&pingA, 12, 13, PING_MM); // trigger=GPIO12, echo=GPIO13

//Set up battery voltage monitor
// (potential divider is disabled when power is off to prevent battery drain)
// If <650, battery needs recharging
PIN_FUNC_SELECT(PERIPHS_IO_MUX_GPIO4_U, FUNC_GPIO4);
GPIO_OUTPUT_SET(4, 0);

WIFI_Connect(sysCfg.sta_ssid, sysCfg.sta_pwd, wifiConnectCb);

MQTT_InitConnection(&mqttClient, sysCfg.mqtt_host, sysCfg.mqtt_port, sysCfg.security);

MQTT_InitClient(&mqttClient, sysCfg.device_id, sysCfg.mqtt_user, sysCfg.mqtt_pass, sysCfg.mqtt_keepalive, 1);

MQTT_InitLWT(&mqttClient, "/lwt", "offline", 0, 0);
MQTT_OnConnected(&mqttClient, mqttConnectedCb);
MQTT_OnDisconnected(&mqttClient, mqttDisconnectedCb);
MQTT_OnPublished(&mqttClient, mqttPublishedCb);
MQTT_OnData(&mqttClient, mqttDataCb);

INFO("\r\nSystem started ...\r\n");

os_timer_disarm(&sys_timer);
os_timer_setfn(&sys_timer, (os_timer_func_t *)tick_service, &mqttClient);
os_timer_arm(&sys_timer, 250, 1); //4 times per second
}
You will also need to set up some configurations in user_config.h:
//MQTT broker config
#define MQTT_HOST "37.187.106.16" //test.mosquitto.org
#define MQTT_PORT 1883

//Set Shelf config
#define ShelfID "112334556" //Change this to a unique number of your choosing!
#define mqttPubTopic "/Sshelf/" ShelfID
#define mqttBattery "/Sshelf/batt/" ShelfID
If you’re not familiar / comfortable with using the SDK, wait for part 2, where I perform the same functionality using the Arduino IDE.
Shelf Demonstration GUI
 As mentioned earlier, the shelf was used to demonstrate a range of different cloud integration possibilities, including persistence and integration with ERP software.
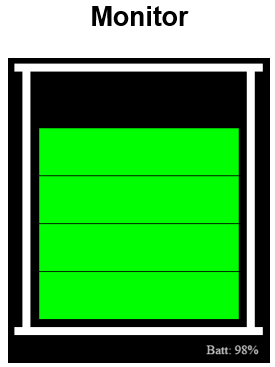
For this blog, I will merely share a javascript web page visualisation that can be opened directly from your hard drive into Chrome (or hosted on any web server).
To build the visualisation, I found a simple javascript drawing library fabric.js that made working with the html5 canvas tag much easier. I used this to build a graphical display to demonstrate the number of reams of paper remaining on the smart shelf.
You could replace my logic with your own by editing the updateGraphic() function.
In addition to fabric.js, you will also need to have mqttws31.js in the same folder as the web page below. This web page code can just be saved as index.html.
Note that you need to scroll across to see some of the longer lines, or alternatively copy and paste into your own editor to view:
<!--Demonstration of the Smart Scale at tinker.yeoman.digital-->
<html>
<head>
<meta content="text/html; charset=utf-8" http-equiv="content-type">
<title>Smart Shelf Monitor</title>

<style>
html, body {
width: 100%;
height: 100%;
margin: 0px;
border: 0;
overflow: hidden; /* Disable scrollbars */
display: block; /* No floating content on sides */
}
</style>

<script type="text/javascript" src="https://ajax.googleapis.com/ajax/libs/jquery/2.1.4/jquery.min.js"></script>
<script src="https://cdnjs.cloudflare.com/ajax/libs/dygraph/1.1.1/dygraph-combined.js"></script>
<script src="mqttws31.js" type="text/javascript"></script>
<script src="fabric.js" type="text/javascript"></script>
<script type="text/javascript">

//settings BEGIN
const DeviceID = "112334556" //Change this to match your unique number setup in your sensor code!
var guiScale = 2 // scale how large to display in your browser
var MQTTbroker = '37.187.106.16'; //test.mosquitto.org
var MQTTport = 8080; //websocket port on mqtt broker
var MQTTLevelTopic = '/Sshelf/' + DeviceID;
var MQTTBattTopic = '/Sshelf/batt/' + DeviceID;
//settings END

var shelflevel = '0';
var battlevel = 'Batt: --';
var eventid;
var canvas;
var l1=0;
var l2=0;
var l3=0;
var l4=0;
var l5=0;

var battText = new fabric.Text(battlevel, { left: 70 + (260 * guiScale), top: 375 * guiScale, fontSize: 12 * guiScale, fill: 'rgb(200,200,200)' });
var level5 = new fabric.Rect({ top: 50 * guiScale, left: 70 + (30 * guiScale), width: 250 * guiScale, height: 60 * guiScale, fill: 'rgb(0,255,0)', stroke: 'rgb(0,0,0)', StrokeWidth: 2});
var level4 = new fabric.Rect({ top: 110 * guiScale, left: 70 + (30 * guiScale), width: 250 * guiScale, height: 60 * guiScale, fill: 'rgb(0,255,0)', stroke: 'rgb(0,0,0)', StrokeWidth: 2});
var level3 = new fabric.Rect({ top: 170 * guiScale, left: 70 + (30 * guiScale), width: 250 * guiScale, height: 60 * guiScale, fill: 'rgb(0,255,0)', stroke: 'rgb(0,0,0)', StrokeWidth: 2});
var level2 = new fabric.Rect({ top: 230 * guiScale, left: 70 + (30 * guiScale), width: 250 * guiScale, height: 60 * guiScale, fill: 'rgb(0,255,0)', stroke: 'rgb(0,0,0)', StrokeWidth: 2});
var level1 = new fabric.Rect({ top: 290 * guiScale, left: 70 + (30 * guiScale), width: 250 * guiScale, height: 60 * guiScale, fill: 'rgb(0,255,0)', stroke: 'rgb(0,0,0)', StrokeWidth: 2});

//mqtt broker
var client = new Paho.MQTT.Client(MQTTbroker, MQTTport,
"myclientid_" + parseInt(Math.random() * 100, 10));
client.onMessageArrived = onMessageArrived;
client.onConnectionLost = onConnectionLost;
//connect to broker is at the bottom of the init() function

//mqtt connecton options including the mqtt broker subscriptions
var options = {
timeout: 3,
onSuccess: function () {
console.log("mqtt connected");
// Connection succeeded; subscribe to our topics
client.subscribe(MQTTLevelTopic, {qos: 0});
client.subscribe(MQTTBattTopic, {qos: 0});

},
onFailure: function (message) {
console.log("Connection failed, ERROR: " + message.errorMessage);
//window.setTimeout(location.reload(),20000); //wait 20seconds before trying to connect again.
}
};

//can be used to reconnect on connection lost
function onConnectionLost(responseObject) {
console.log("connection lost: " + responseObject.errorMessage);
//window.setTimeout(location.reload(),20000); //wait 20seconds before trying to connect again.
};

//what is done when a message arrives from the broker
function onMessageArrived(message) {
var topic = message.destinationName;
var msgvalue = message.payloadString.replace( /^\D+/g, ''); //remove any text spaces from the message

//console.log(topic + ':' + MQTTLevelTopic);
switch(topic){
case MQTTLevelTopic:{
shelflevel = msgvalue;

//Start with assuming shelf empty
l1=0;
l2=0;
l3=0;
l4=0;
l5=0;

shelfleveln = (Number(shelflevel));

if (shelfleveln <= 73 ) {
l5=1;
}

if (shelfleveln <= 124 ) {
l4=1;
}

if (shelfleveln <= 178 ) {
l3=1;
}

if (shelfleveln <= 231 ) {
l2=1;
}

if (shelfleveln <= 284 ) {
l1=1;
}
}
break;
case MQTTBattTopic:{
battlevel = 'Batt: '+ String(Math.round((Number(msgvalue) - 630) / 1.29)) + '%';
}
break;
};

var x = new Date(); // current time

//console.log(msgvalue);

updateGraphic();

};

//function that is called once the document has loaded
function init() {
// Connect to MQTT broker
client.connect(options);
};

function sendLED(sendmsg) {
message = new Paho.MQTT.Message(sendmsg);
message.destinationName = "/sensor/ctrl/" + DeviceID;
client.send(message);
}

function updateGraphic() {
canvas.remove(battText);
battText = new fabric.Text(battlevel, { left: 70 + (260 * guiScale), top: 375 * guiScale, fontSize: 12 * guiScale, fill: 'rgb(200,200,200)' });

if (l5==1) {
canvas.remove(level5);
canvas.add(level5);
}
else {
canvas.remove(level5);
}

if (l4==1) {
canvas.remove(level4);
canvas.add(level4);
}
else {
canvas.remove(level4);
}

if (l3==1) {
canvas.remove(level3);
canvas.add(level3);
}
else {
canvas.remove(level3);
}

if (l2==1) {
canvas.remove(level2);
canvas.add(level2);
level1.fill = 'rgb(0,255,0)';
}
else {
canvas.remove(level2);
level1.fill = 'rgb(255,0,0)';
}

if (l1==1) {
canvas.remove(level1);
canvas.add(level1);
}
else {
canvas.remove(level1);
}

canvas.add(
battText

);

}

function createGraphic() {

canvas.add(
new fabric.Rect({ top: 30 * guiScale, left: 70, width: 310 * guiScale, height: 10 * guiScale, fill: 'rgb(255,255,255)'}),
level5,
level4,
level3,
level2,
level1,
new fabric.Rect({ top: 360 * guiScale, left: 70, width: 310 * guiScale, height: 10 * guiScale, fill: 'rgb(255,255,255)'}),
new fabric.Rect({ top: 40 * guiScale, left: 70 + (10 * guiScale), width: 10 * guiScale, height: 320 * guiScale, fill: 'rgb(255,255,255)'}),
new fabric.Rect({ top: 40 * guiScale, left: 70 + (290 * guiScale), width: 10 * guiScale, height: 320 * guiScale, fill: 'rgb(255,255,255)'}),
battText

);
}

//settings for the chart
$(document).ready(function() {
document.body.style.backgroundColor = "black";
var c = document.getElementById('c');
c.width = 450 * guiScale;
c.height = 750 * guiScale;

canvas = this.__canvas = new fabric.Canvas('c');
createGraphic();

canvas.setBackgroundColor('rgba(0, 0, 0)', canvas.renderAll.bind(canvas));
}
);

</script> </head>
<body onload="init();">

<div id='d1' align="center">
<canvas id='c' width="450" height="750" >
</canvas>
</div>

</body>
</html>
i’am not a arduino or nodemcu User
Best Job
with SDK 🙂
Thank you for this Post