ESP8266 and IoT: Streaming serial accelerometer data via MQTT

>>> This site will be retired in Dec 2024. Please see the new site at tinkerwithtech.net <<<


mqtt-accel

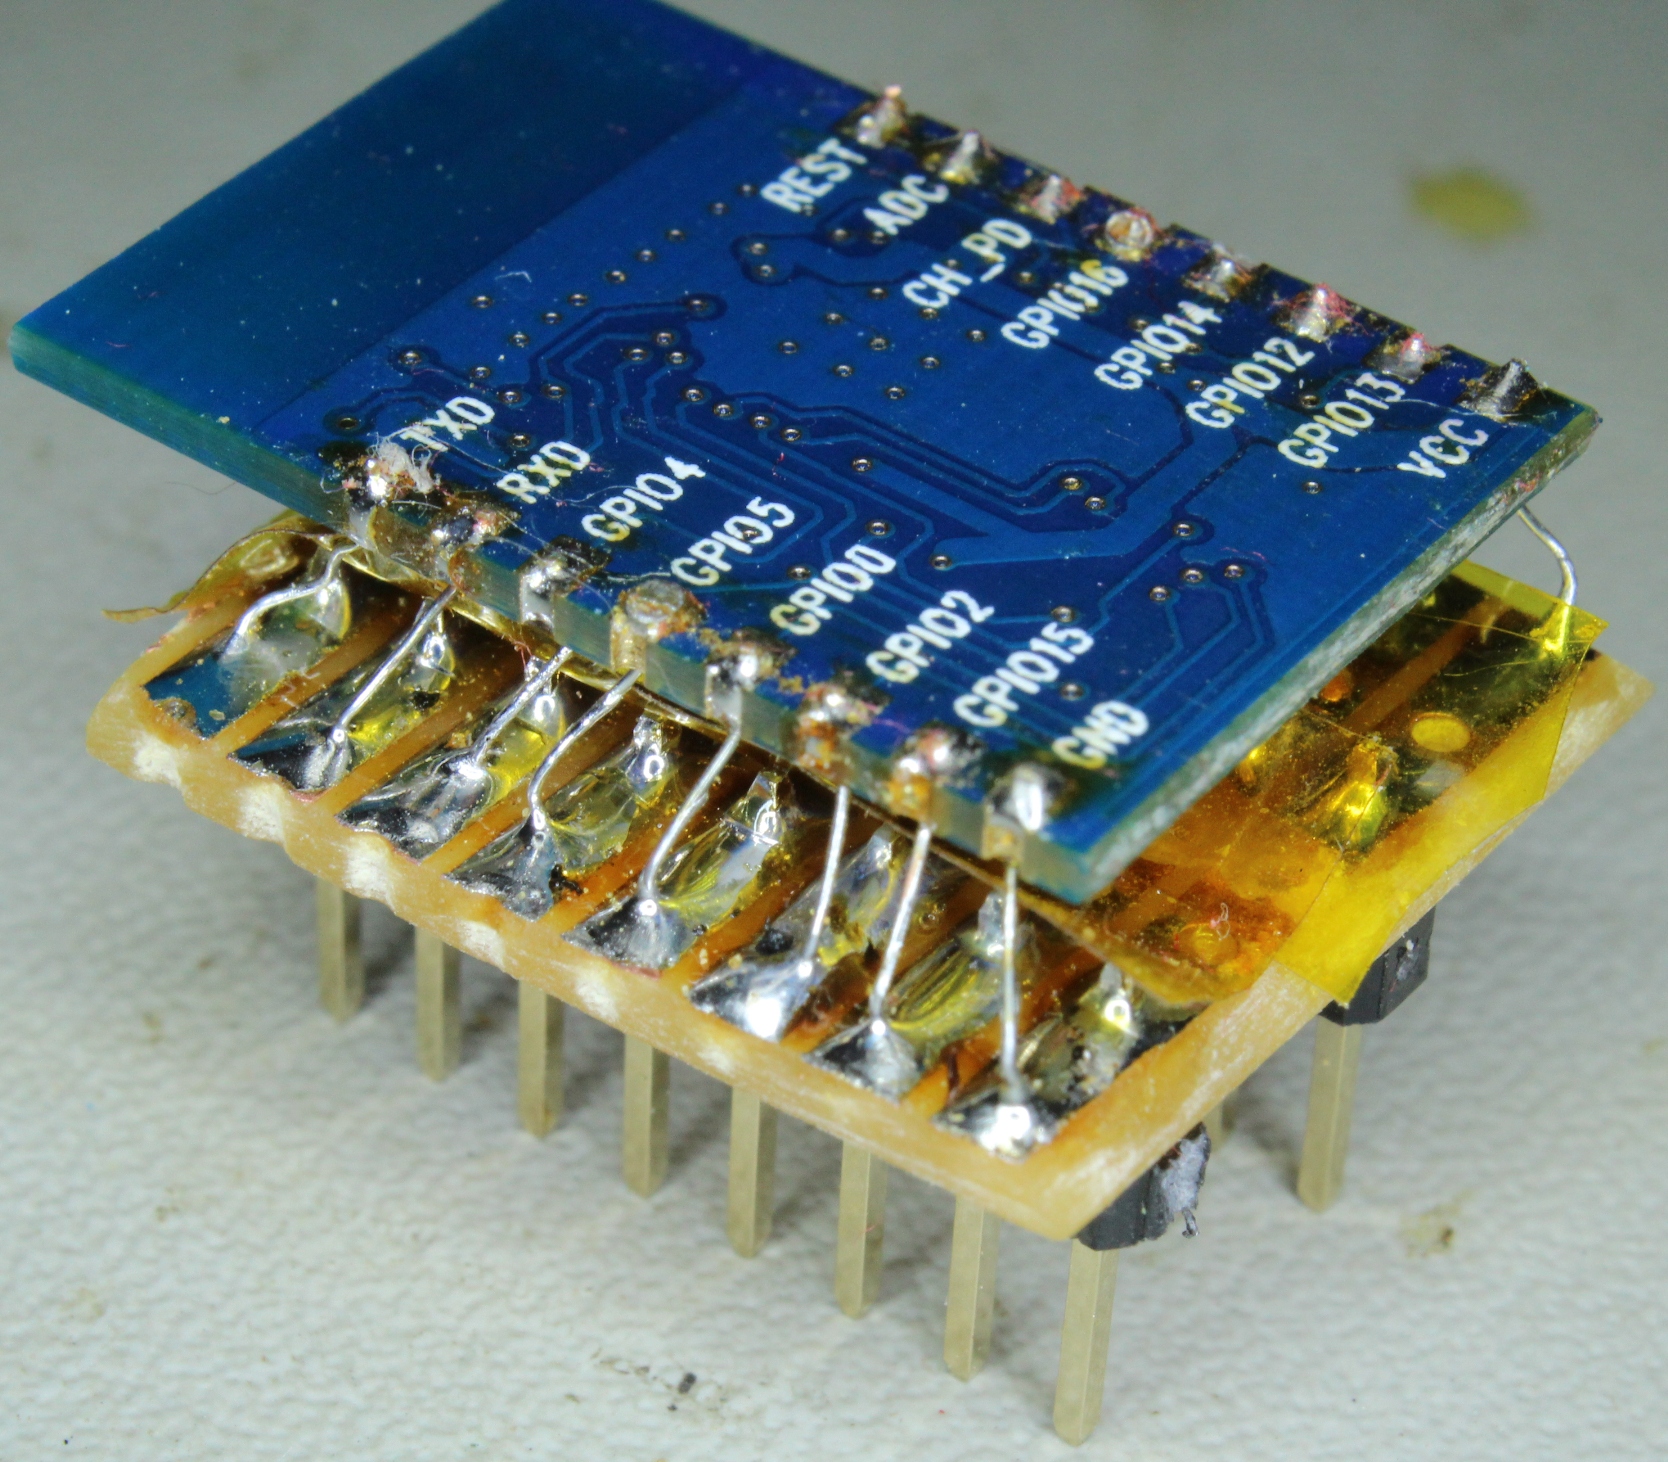
Over the last couple of weeks I have been sidetracked by another project – about which I’ll certainly share more details when it is done. The project has a requirement to stream readings to the Internet from an accelerometer (in a very small form factor), so I decided to pair one with an ESP8266.

IMG_4377As I work more with the ESP8266, I am finding a common theme when using this chip.

On the one hand its low cost and extreme functionality in a very small package makes it a real game changer, and I was glad to see an article in Hackaday a week or so ago bringing this message to a wider audience. Essentially, the ESP8266 is not much more difficult to program than an Arduino, yet gives you a tiny, single-MCU solution with Wi-Fi included.

BUT, on the other hand, it can be really difficult to find good, clear information – at which point it suddenly becomes NOT an easy task to get something done. Although this situation is changing, it currently costs me more hours than I would have imagined to accomplish certain tasks.

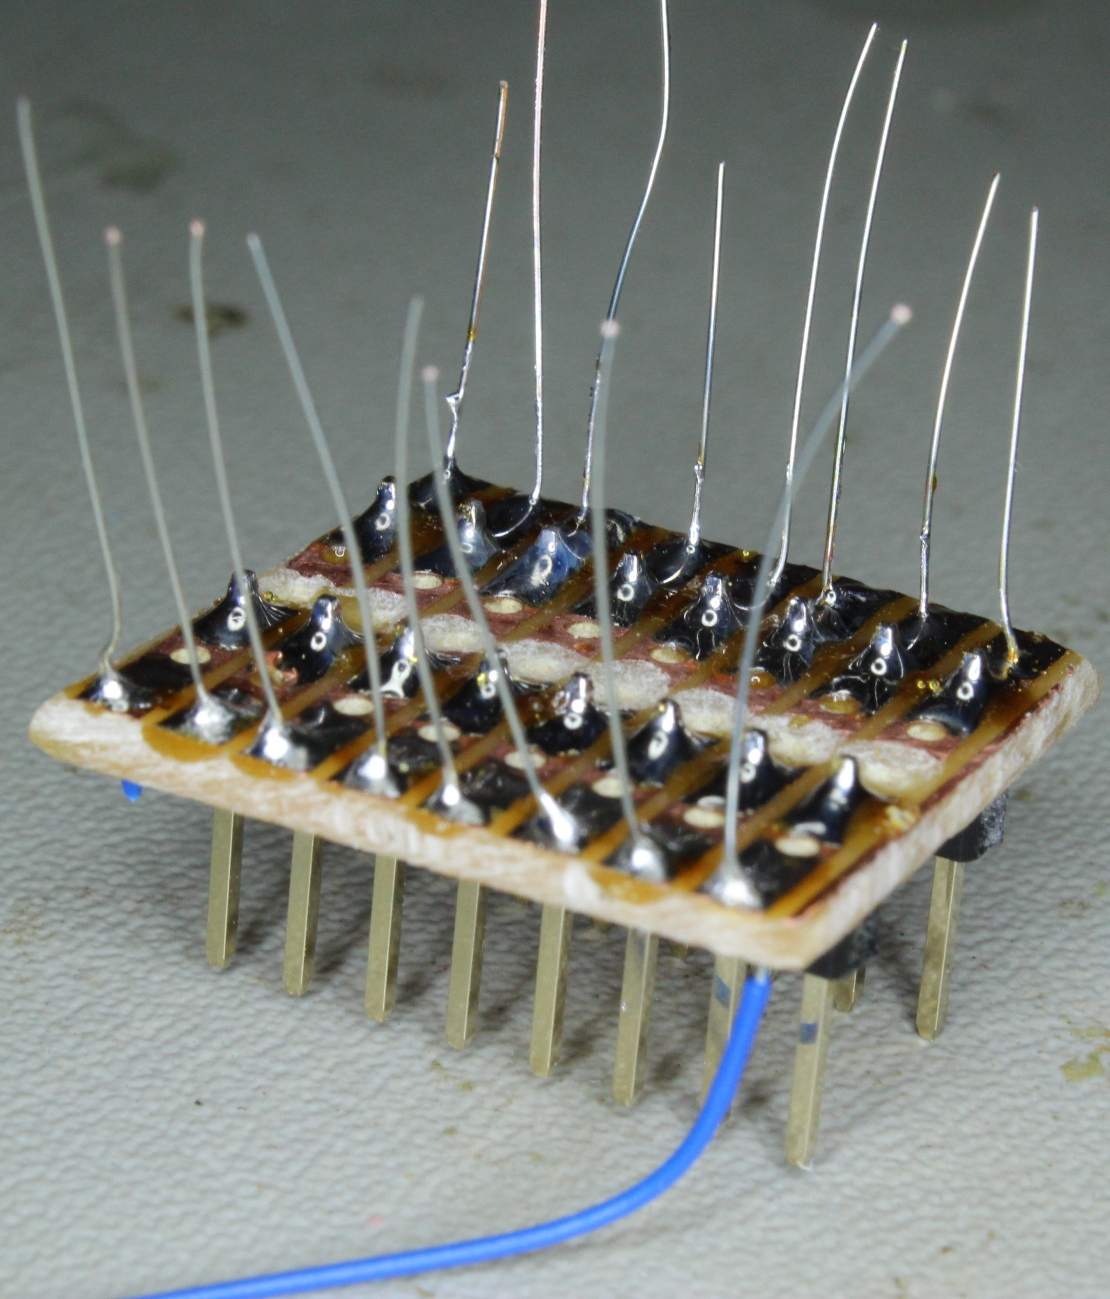
I found myself in this wilderness recently after selecting the ADXL345 accelerometer chip, which I chose mainly because it works off 3.3V and because it has a good reputation. It also supports both SPI and I2C, which gives greater flexibility when interfacing to an MCU. So far, so good.

IMG_4378This blog post details the different approaches I tried, and the challenges I faced. These were:

  • I2C
  • Hardware SPI
  • Software SPI

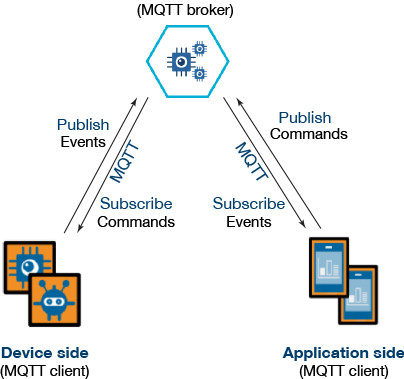
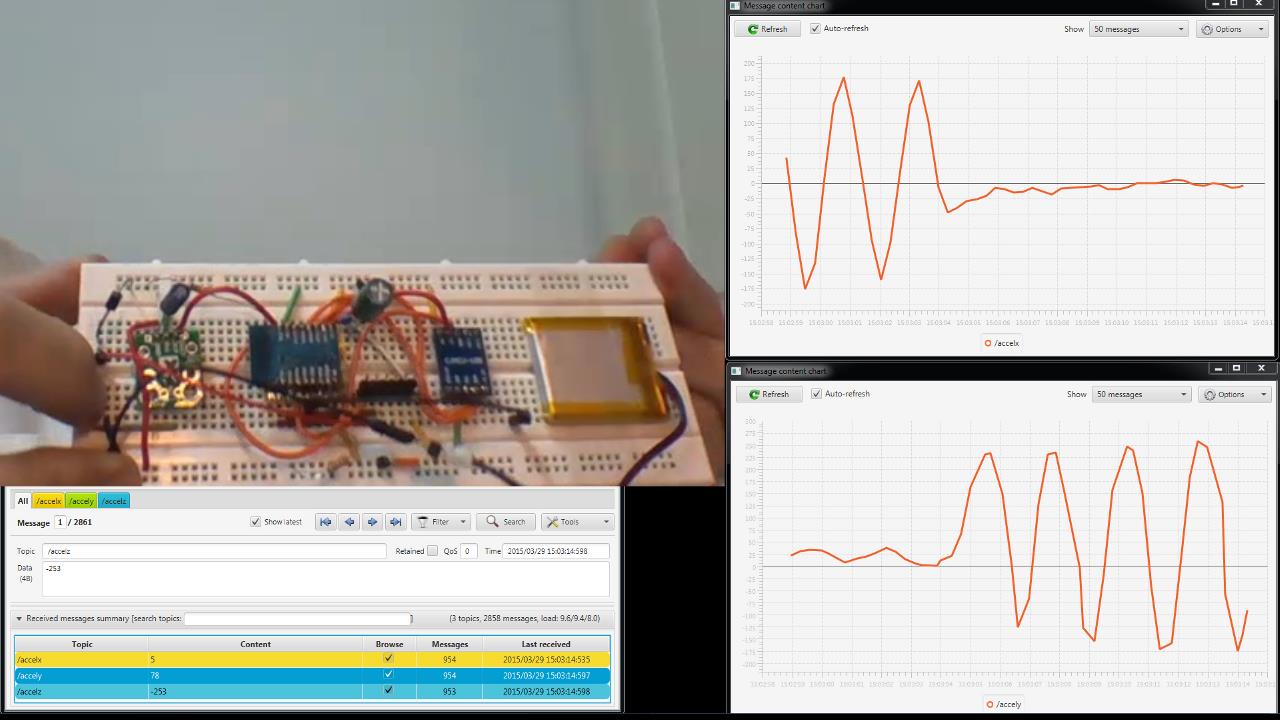
At the end I include a video showing a working ESP8266 (ESP-12 version, because I will later need an ADC) streaming accelerometer readings to an MQTT broker running on a Raspberry Pi, with results shown graphically on a PC, which is connecting to that broker.

Continue reading

Investigating MQTT persistence in an IOT protocol on the ESP8266

>>> This site will be retired in Dec 2024. Please see the new site at tinkerwithtech.net <<<


One of the most important reasons that I considered using MQTT for my haptic wristband project was because of its ability to handle devices that are intermittently connected. IOT devices, even if nominally switched on, may at any given time be unavailable due to sleep modes (even although this direction did not prove as promising on the ESP8266 for my application as I’d initially hoped), or simply because the device has temporarily lost Wi-Fi connectivity.

MQTTInspector_s
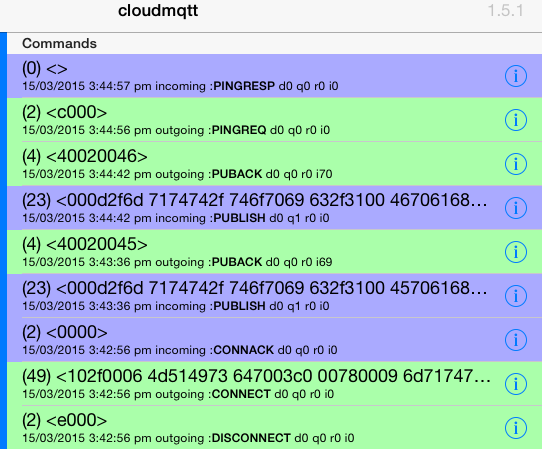
Whatever the cause of disruption, the MQTT architecture provides for the broker to store any important messages (i.e. those flagged with high qos or “quality of service”) to be later delivered to a client that had been previously subscribed, also with high qos, but is at that point in time disconnected.

For my project this is crucial. I have always envisaged my wristband to be an additional “priority” channel to cut through the barrier of noise created by the visual overload of our multiple screens, through the beeps and buzzes representing emails, meeting requests, tweets, texts, phone calls and missed calls – which are themselves competing for (hopefully) the majority of your attention directed at real people and real objects around you as you do your job and live your life!

Therefore, as a device that handles relatively few but very important notifications, a missed message is unacceptable.

Unfortunately, as I hinted at last week, I struggled to get this MQTT mechanism to work. The main problem I was having was that I was not sure where the fault lay – and even wondered if I was misunderstanding the way that MQTT should work. I began to suspect that the free MQTT broker that I was using did not support this more advanced behaviour. As it transpired, and thanks to some timely help from Carl at CloudMQTT support, the MQTT broker turned out to be fine – it was both the ESP8266 client and the MQTT test software that I was using that were dropping the ball.

After wading through many documents on the web, I also realised that this whole area of MQTT persistence is quite confusing and not well explained from the point of view of someone actually wanting to make use of it. So, in this post, I aim to first explain how persistence should work, and then afterwards provide all the details for someone to actually try it out for themselves. Along the way I also discover a couple of great new products. Continue reading

Reducing ESP8266 Power Consumption using deep sleep

>>> This site will be retired in Dec 2024. Please see the new site at tinkerwithtech.net <<<


[Update May 2016: for reducing power consumption of a NodeMCU board, see this post where I revisit the topic].

In my previous post, I mentioned that one of the reasons that I was excited about MQTT was because of its potential to allow power savings schemes on the ESP8266. The MQTT broker could asynchronously hold messages during the period that the ESP8266 was in a sleep cycle, to ensure that nothing is missed while dramatically reducing average power consumption.

This week I have hit a few obstacles, mainly due to the immaturity of current implementations of some of the latest MQTT qos (quality of service) features – at least that is what I suspect at this point. But more on that next week.

So, focusing on the ESP8266: my initial research had led me to believe that “deep sleep” mode was the way to go. Who can argue with using just 78μA during deep sleep?

To be able to implement deep sleep (without adding extra hardware to generate a wake-up signal), you need to link 2 pins on the ESP8266, as discussed here. Fortunately, the ESP-03 module has pads broken out on the PCB that you can join together. By linking these, you lose the ability to use GPIO16, but gain an automatic wake-up from deep sleep after the number of microseconds that you specify in the system_deep_sleep(time_in_us) call. You can understand better how this works by looking at the ESP-03 schematic.

To avoid any confusion, the pads to join are shown below:

ESP-03-rst1 Continue reading

Investigating MQTT as an “IoT protocol” for the ESP8266 wristband

>>> This site will be retired in Dec 2024. Please see the new site at tinkerwithtech.net <<<


I have recently had a rethink about how I will link my wristband to an alert source.

To demo my first prototype, I hosted a web page on the ESP8266 device itself. Selecting a button on the web page posted a value, which activated the chosen vibration pattern. This is a very convenient way to demo the concept, but, in the real world it has some significant drawbacks.

The first drawback is that the whole submit / refresh cycle of a web page is not particularly fast, which also probably means that the web server on the ESP8266 is having to do a relatively large amount of work. I therefore had originally planned to eliminate some of this overhead by following the approach in the ESP8266 IoT example of using http methods and json, which can be called from anything (e.g. from another pc/server by using the curl command).

But this does not solve a second issue, which is that the ESP8266 server has to be “always on”, waiting for a command from the remote web page. This is likely to make power savings measures (sleep cycles) difficult, which is less than ideal given that Wi-Fi is not as power efficient as Bluetooth – notwithstanding that Wi-Fi continues to evolve.

The third problem is the direction of the link. To communicate with the wristband requires that you initiate a connection. This is not a problem if you are on the same network (and also assuming you always know the ip address of the wristband). However, if the source of the alert is from outside the network, a firewall port will need to be opened and forwarded – something that will usually be out of the question on most corporate networks.

With this background, and inspired by Peter Scargill’s exploits, I decided to investigate MQTT. Potentially if offered to solve all three of my issues:

  • It is a lightweight protocol, optimized for resource-constrained devices (like the ESP8266) – refer to here and here.
  • Because it uses a broker in the middle, both the client and the (wristband) device talk to the broker, not to each other. This allows for an asynchronous communication scenario in which I could allow the wristband to, for example, check the broker for messages and then go to sleep for a second, yet be guaranteed not to have missed a message when it next checks at the end of that second. Such a duty-cycle could dramatically lower the overall power consumption.

MQTT-architecture

  • The broker architecture also solves the firewall problem by reversing the direction of the connections. Now the wristband will initiate the connection to the broker, which can thereafter communicate without the need for port forwarding.

Continue reading