I have recently had a rethink about how I will link my wristband to an alert source.
To demo my first prototype, I hosted a web page on the ESP8266 device itself. Selecting a button on the web page posted a value, which activated the chosen vibration pattern. This is a very convenient way to demo the concept, but, in the real world it has some significant drawbacks.
The first drawback is that the whole submit / refresh cycle of a web page is not particularly fast, which also probably means that the web server on the ESP8266 is having to do a relatively large amount of work. I therefore had originally planned to eliminate some of this overhead by following the approach in the ESP8266 IoT example of using http methods and json, which can be called from anything (e.g. from another pc/server by using the curl command).
But this does not solve a second issue, which is that the ESP8266 server has to be “always on”, waiting for a command from the remote web page. This is likely to make power savings measures (sleep cycles) difficult, which is less than ideal given that Wi-Fi is not as power efficient as Bluetooth – notwithstanding that Wi-Fi continues to evolve.
The third problem is the direction of the link. To communicate with the wristband requires that you initiate a connection. This is not a problem if you are on the same network (and also assuming you always know the ip address of the wristband). However, if the source of the alert is from outside the network, a firewall port will need to be opened and forwarded – something that will usually be out of the question on most corporate networks.
With this background, and inspired by Peter Scargill’s exploits, I decided to investigate MQTT. Potentially if offered to solve all three of my issues:
- It is a lightweight protocol, optimized for resource-constrained devices (like the ESP8266) – refer to here and here.
- Because it uses a broker in the middle, both the client and the (wristband) device talk to the broker, not to each other. This allows for an asynchronous communication scenario in which I could allow the wristband to, for example, check the broker for messages and then go to sleep for a second, yet be guaranteed not to have missed a message when it next checks at the end of that second. Such a duty-cycle could dramatically lower the overall power consumption.
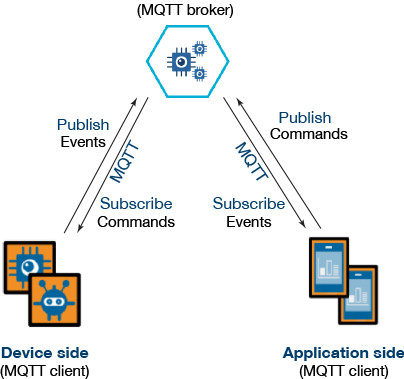
- The broker architecture also solves the firewall problem by reversing the direction of the connections. Now the wristband will initiate the connection to the broker, which can thereafter communicate without the need for port forwarding.
To learn more about MQTT, I highly recommend that you read this recent 7-part HiveMQ series on MQTT.
 For this project I am not really interested in hosting my own MQTT broker, because the whole objective is to get the broker outside firewalls, into the cloud. Beyond that, building another separate device just to support a wristband moves away from the minimalist goal of this project. I might as well then go the alternative route of tethering a BLE device to a Wi-Fi smartphone.
So, I searched Google for “mqtt broker cloud“… and, what do you know, such a concept exists.
I settled on CloudMQTT because they offer a basic plan that is free (but also includes authentication) – perfect for the sort of experimentation that I am doing.
After you have signed up, you will need to go to your CloudMQTT admin console to create a new MQTT broker instance.
You then need to view your “instance details” to get the info for configuring your MQTT clients:

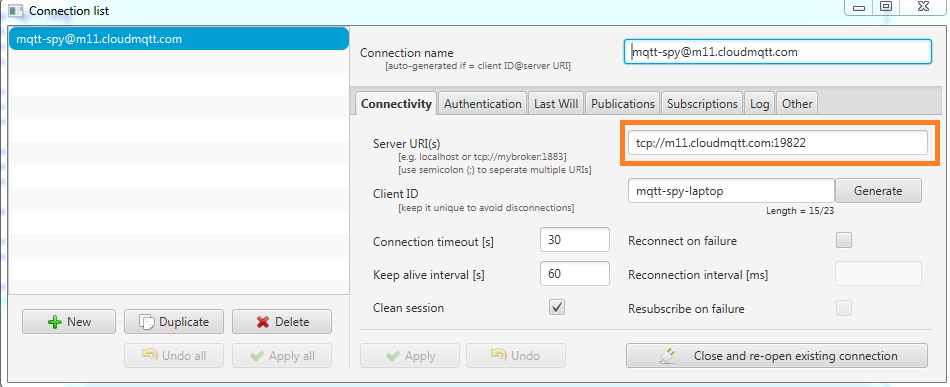
 The easiest way both to publish test messages and to monitor MQTT activity is to download and use mqtt-spy (to do this the getting started guide is very helpful).
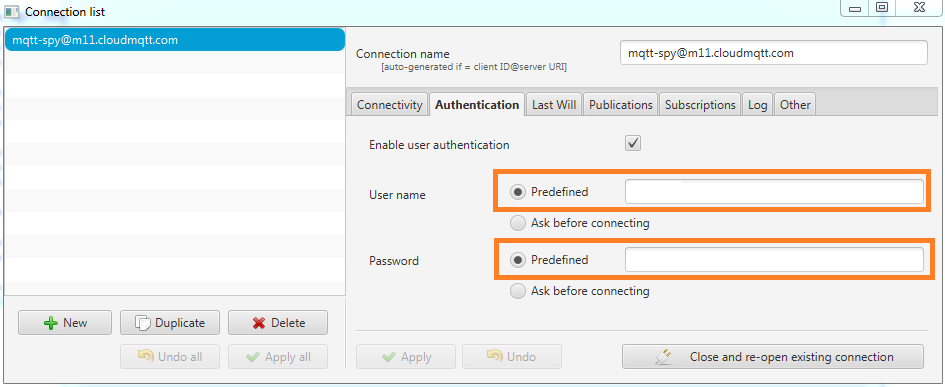
You will need to take the parameters from your CloudMQTT setup above to configure both the “connectivity” and “Authentication” within mqtt-spy, as shown below:
Once, this is done, you have a broker and a publisher ready. Now for the most important part: setting up the ESP8266.
Fortunately, the SDK that I am using includes an MQTT library for the ESP8266 (which has its own wiki and a forum).
The first step is to specify the COM port that you are using to connect to the ESP8266 by editing the Makefile under the esp_mqtt folder:
ESPPORT ?= COMx
Next, the MQTT and your Wi-Fi details need to configured within include/user_config.h
#define MQTT_HOST "m11.cloudmqtt.com"
#define MQTT_PORT 19822

#define MQTT_CLIENT_ID "make_up_your_own"
#define MQTT_USER "Username_from_above"
#define MQTT_PASS "Password_from_above"

#define STA_SSID "your_WiFi"
#define STA_PASS "WiFi_password"
In user_main.c, within the mqttConnectedCb procedure, you then enter your topics to which you will subscribe and potentially publish:
MQTT_Subscribe(client, "/mqtt/topic/1", 0);
Finally, within the mqttDataCb procedure, you can define what actions occur when a message is received on a subscribed topic, where:
topicBuf – contains the full topic e.g. “/mqtt/topic/1”
dataBuf – contains the message
You can see this in an example implementation, where MQTT on the ESP8266 drives an lcd.
By default, if you compile the esp_mqtt example, you can test that everything is working by first subscribing mqtt-spy to /mqtt/topic/1, and then starting your ESP8266. The ESP8266 should send a “hello1” message on bootup:
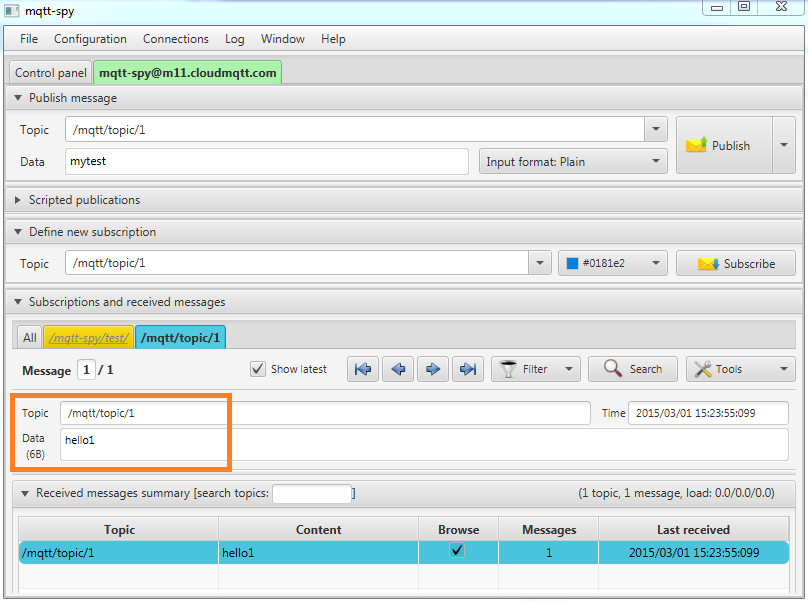
In my case, this all worked fairly painlessly.
Next, I just need to port my vibrating wristband routines to this framework, which should be easy. Then test out MQTT further. All very exciting!